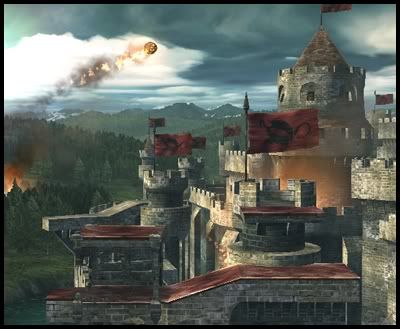
Week 1 - Pictochat
Rating:  Pros:
Pros: "Large top blastzone protects against early upwards deaths, short side blastzones for easier kills"
Cons: "Almost no area below the stage, going off stage is severely restricted because of it. Side blastzones can also cause you early deaths. Random percents and kos due to the level"
Counterpick Against:
Ban Against:
Summary: "I do not like this level for Jiggs. At all. If this level gets CPed on me, I switch characters. The random percent you might take from the hazards matter way more for us, we have to constantly play to keep our percentage as LOW as possible, we can't afford a few stray % points. Watch out for Kirby on this level, I play against two
really good Kirby's on a frequent basis, and one of them has so many tricks on this level it's mind blowing. Plus his Fsmash will kill us EARLY. Pick this level against Fox, the random platforms that spawn will limit his movement severely, and he generally kills upwards, take that advantage away from him." - PNDMike
Week 2 - Brinstar
Rating:
Pros: The small dimensions of the stage improves Jigglypuff's offstage game as well as strengthening many of her kill moves (namely Rest). The acid may be used to protect yourself from an offstage Rest as well as offering a costly 7th jump in case you use up your jumps when attempting an offstage gimp or kill. The vegetation on the stage offers a way to de-stale your moves, which helps for when the opponent gets in kill range. The permeable bottom floor allows for flexibility when recovering, and also the ability to attack while underneath the stage (sharking).
Cons: The small dimensions works against us as well, and Jigglypuff is susceptible to even earlier deaths. Rollout's usefulness is also limited due to the vegetation joining the stage halves together. Poor sharking can also lead to on-stage spikes from the opponent.
Counterpick Against:
Ban Against:
Summary: This stage is one of Jigglypuff's bread and butter stages and should be treated as such. High risk/high reward comes into play here.
Week 3 - Castle Siege
Rating:
Pros:
Stage 1 - The actual stage is fairly small, which keeps you close to your opponent. The main goal of Stage 1 is to damage your opponent and possibly get an early gimp kill. The lips of the stage may hinder some recoveries, but certainly not Jigglypuff's.
Stage 2 - The statues offer a way to refresh your moves and protect against projectile spam somewhat. Rest's hitbox also increases when resting a solid object such as the statues. The walk-off sides can lead to early kills.
Stage 3 - "It's like lylat cruise and FD had a child, and I love it. The tilting is actually great for us, as the level can tilt away from someone who is about to grab the ledge, or it can allow us new approach options or chasing options. Bair them into a higher portion and having them tech can be a free rest or rollout. Hopefully you've freshened up your moves enough to abuse the opponent on this part. Go for the kill, and soften them up for the transformation." - PNDMike
Cons:
Stage 1 - Below the platform on the left side offers an excellent camping position.
Stage 2 - Having a floor shuts down many potential kill options. While the walk-off edges may lead to early kills, please remember that you're Jigglypuff; we're dying first.
Stage 3 - This is only 1/3 of Castle Siege.
Counterpick Against:
Ban Against:
Summary: In order to do well on this stage, you must be able to change play styles and adapt to every segment of the stage. It's not one of her best stages, but she does very well on Stage 1 and 3.
Week 4 - Rainbow Cruise
Rating:
Pros: Jigglypuff is a character who loves to take to the skies, and Rainbow Cruise forces this. Aside from the boat, there are VERY few edges for opponents to grab onto, which makes gimping exceptionally easy. Jigglypuff's high airspeed allows her to stall and aircamp like the best of 'em, hopping from platform to platform, and waiting for the opportunity to capitalize on the opponent's mistake of following her. Transitions 1 and 2 have a relatively high ceiling, which helps prevent untimely deaths.
Rest also kills retardedly early during Stage 3 and 4.
Rainbow Cruise also has a bit of an "unknown" factor; the opponent not knowing the stage layout can work GREATLY in our favor.
Cons: Stages 3 and 4 have EXTREMELY low ceilings, and being the lightest character doesn't help very much. The close left blast line during the ascent can work against us, and you could possibly be carried away during the falling portion of the stage.
Counterpick Against: (lol)
Ban Against:
Summary:
Week 5 - Frigate Orpheon
Rating:
Pros: During the first transition, the right side lacks a true ledge, which can screw over "precise" recoveries such as Marth and Ganon. If they choose to recover high, we can punish RCO lag, and if they recover low, they risk not getting onstage at all. Luckily, Jigglypuff is not limited in this way.
Frigate is known for it's flipping mechanism, which eases our gimping game with little risk for us. Jigglypuff
will should NOT die from a stage flip (aside from a near-flip Rest), even if she happens to get "trapped" underneath the stage.
The side blast lines are fairly small, which can make Fair and gimp kills a bit easier.
Cons: Many of Frigate's cons comes from the center platform transition. We lose our recovery advantage due to the right side getting it's ledge back. The "dip" in the stage is more beneficial to projectile-wielding characters (aside from perhaps Falco and Fox) due to the relative safety the dip provides. The overhead platform and stage depression can make our approach a living hell against these characters.
Counterpick Against:
Ban Against:
Summary:
Week 6 - Delfino Plaza
Rating:
Pros:
Cons:
Counterpick Against:
Ban Against:
Summary:
Week 7 - Norfair
Rating:
Pros:
Cons:
Counterpick Against:
Ban Against:
Summary:


 .
.